![[OFFICIAL][MM][RPT] XOSP 6.3 - 3.4.67 Kernel - Final Build For Micromax Unite 2](https://blogger.googleusercontent.com/img/b/R29vZ2xl/AVvXsEggBTE1nIlAmJU2xRHnUohbRVjTSEm5NLwttW45KE231R6LhX1urVhlL-2kqiTvxDFOv602EC7xKylRZbccv1o2d_7h1l8eXc9b_Cm9uEhtfk_pUL31w4b_fberlHWcJGjjvAAX10G1O2OY/s72-c/https-%25252F%25252Fraw.githubusercontent.com%25252FXOSP-Project%25252Fxda_thread_template%25252Fmaster%25252Fbanner_images%25252Fxosp-logo+%25281%2529.gif)
![[6.0.1][STABLE][OTA] Resurrection Remix v5.6.8 For Micromax Unite 2](https://blogger.googleusercontent.com/img/b/R29vZ2xl/AVvXsEjgazUgVYfhUx8BRw_h67Lgm5VEmnk9wkgotifkJzQbSBHxg9OzmjhxBRY0ILA4Fn6_WBV66GYbX5QyMI79ckYaZ_q7Y4pS-1CklQVi92U7EFI-HLVIau97Tw4E-r-BwGUOOgiVOCSM77k/s72-c/2016+-+1.png)
![[Latest][STABLE][R72] Resurrection Remix (RR) v5.7.4 r72 for Micromax Unite 2 By Team R.A.M.](https://blogger.googleusercontent.com/img/b/R29vZ2xl/AVvXsEjBMRAhOTS6_TAOLNIHGxB3gu8XasPP5QKEuKk3CYE6S0ZnQuZatDbSLIPydQtuRzMfnVX7RIUqieilgQD4yzT-55DOVggV07uRefrXR4gC5LILYm0Pm3saH4uneV7aU_1s0wiBHpdGh1QX/s72-c/14441048_1847810672108651_6855740913213033405_n.png)
![[P-BUGLESS] Resurrection Remix Final MM v5.7.4 r74 For Micromax Unite 2 (MT6582)](https://blogger.googleusercontent.com/img/b/R29vZ2xl/AVvXsEi5h9L-4UE-Nz5MGy7AxCdvgFkoPCIg16WyPrzcLkm9Nw7-utV5ObdYRpuAUR9ACZKjywgmpDniWr0tU-fYOc4o0DFaC1pmG37hweUvymKx6ujsj577Md0t-MK5H_mqyL5a5bZ8iz1BrVo/s72-c/rr.png)
![[GUIDE][MT6582 - 6592 - 6572] How To Port Cyanogenmod Based Roms For Mediatek Devices](https://blogger.googleusercontent.com/img/b/R29vZ2xl/AVvXsEi_XT2vtLXurMB5I0Suvm23se7852EBqvCZ954F2YWrvpdh_ieI0sEL01-RR3pO8uybyemvJBnv4iqPnD2Y6ScuZ78wq51TpJY5nnvX5Uv1BMeId_ECCwv0RaEyDegg32OYCz6V767ho2M/s72-c/cyanogenmod-rom-galaxy-fame-s6810.jpg)
![[BETA][4.4] MIUI V8 - 6.6.23 China Developer Rom By CPT Reborn](https://blogger.googleusercontent.com/img/b/R29vZ2xl/AVvXsEjN2FGA665fJg0sMPUrU-b78jDREd_FJ1mfzylJ4jUvx5ESFPrF69S8lNG4OUNKOgAnyNwgjdrwm1b-yQKFjti73Z6y_dPHzTfG3LvfuXXHEetZazpiInsgzN9l-JTeOeKnWH89zew2b1LV/s72-c/173447mni04q030imq0iqi.png.thumb.jpg)
![[BUGLESS][AOSP][LP] Liv Ui For Micromax Unite 2 By Team RAM](https://blogger.googleusercontent.com/img/b/R29vZ2xl/AVvXsEiewNLwUiv0KEAzD_WLfpl2Iia__dU2hn6u1s4fnq9Q-Ao7Z3WVo8a0SpzqK-hJZPbFDrLoeVao9ZOMC5gtBYd2qKN0Igyh8L40nFbNJ3_Jq6agKMtfzd2-sM1GyBxIGBB1Pzgb-ps18lLM/s72-c/unnamed.jpg)
![[CM 13][SEPT BUILD] CM 13 FOR MICROMAX UNITE 2 BY R.A.M.](https://blogger.googleusercontent.com/img/b/R29vZ2xl/AVvXsEj5_bz7CrmFjx8b3QeSpumo9szISTvFiGuF0M2Wq3bdHhL8P-NIoxpl63ZyUhKsaZIomhwqXZDMEi-C8ZukFGT2CwSvwq5qSlaFrdrpMr6qPrL8i7p9uiLmYSCgaYKqGgkcuXEdy0fL0cy9/s72-c/Cyanogenmod-13.jpg)
![[BUGLESS] MIUI 8.1.1 Global Stable MultiRom For Micromax Unite 2](https://blogger.googleusercontent.com/img/b/R29vZ2xl/AVvXsEiEJ3knr-j1cAmQyswc7A-8DToOz4dEY7tV83hqzumJGsft2FrWbWNW-7AUfUCUh-P4z2_ERIusQhZ4JlhrDDVuqB1l8Sw3V3Qd8vvks0mg-7Vespnhjyykn_gcjLI797lO9jnIq3v95RXr/s72-c/Screenshot_2017-01-25-18-13-48-620_com.android.settings.png)


How To Port CM Based Roms For Mtk Devices
Hi Future Porters ... Today we are going to Learn Porting CM Based roms either CM11 OR 12 OR 13 ... This Guide is completely user-friendly ... From Pro to Newbies ... This Guide is intended For Everyone ... Lets Start

First Taking All The Things Ready
This is a very important stage of taking all the necessary Thins ready ... So lets take a look the Things
Stock Rom : Please select the stock rom of your device according to what you are working on your Port Rom.For Example ,
- If Port Rom is Marshmallow Based (6.0) and Kernel 3.4.67 - Always Take A Stock Rom which has same Android version and kernel version ...
- If Port Rom is MT 6582 and Your Stock Rom Must be MT6582
- If Port Rom is MT6592 and your Stock Rom is MT6582 and vice versa ... This Thing Is now termed as CROSS-PORTING and u can cross-port roms to your device with another guide --> HERE (Soon)
- Some Roms Already Ported For Unite 2 can also be taken as Stock Rom , HERE
Port Rom : As Explained Above , Start finding our Port Rom ... Some Links are given below :-
MTK BOOTIMG Tools :- Download
Notepad ++ :- 32Bit64 Bit
WinRaR :- 86/32 Bit -- 64 Bit
Lets Start Porting ...
Good Luck
Notepad ++ :- 32Bit64 Bit
WinRaR :- 86/32 Bit -- 64 Bit
Lets Start Porting ...
Good Luck
- First Make 2 Folders named Port Rom and Stock Rom in any Folder

- Now copy Stock Rom zip in Stock Rom Folder and Port Rom zip in Port Rom Folder

- Install WinRaR ... Now select the Stock Rom.zip and Rigt-click and select extract Files and Then Click on ok .. Do This Same For Port Rom.zip

- After Successful Extract Of Both the Roms... Your Folder will look like this...

- Now Extract the same with MTK BootIMG ... Open Both Stock And Port folders on different window ...

- Copy Boot,img Of STOCK rom in Stock folder and Boot.img of PORT rom in Port folder and open unpack.bat on both stock and port folder ...

- Your Folder will look like this ...

- Now copy Kernel From STOCK And Replace It in PORT ... Now go to initrd and Copy unevented.rc from STOCK And Replace it in PORT .. Now Go Back and open Repack.bat ... Now Your Folder will look like this...

- Now Copy boot-new.img and copy it on Port Rom's Folder ... Now delete Boot.img From Port Rom's Folder and Rename boot-new.img to boot.img
- Now Navigate to META-INF\com\google\android on both the Roms ... Your Folder will look like this...

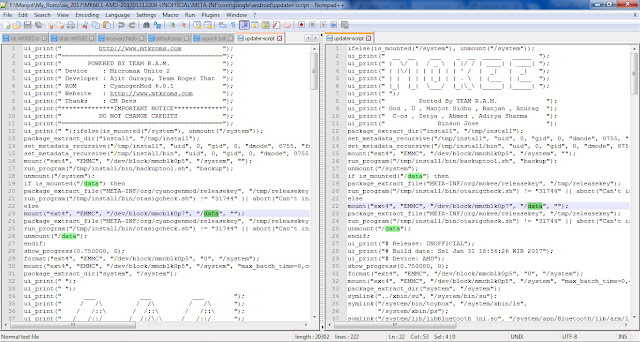
- Install Notepad ++ ... Now right-click updater-script of Stock Rom's and select edit with notepad ++ ... Do the same for Port Rom's updater script .. Now the screen will look like this

- Now find the lines starting with mount (There can be more than 1) ... Now Compare these mount lines of Port Rom with Stock Rom ... NOTE :- Only Compare if they both have same mount type which means there should same matching like /system or /data on both sides ... In the below picture I am comparing only /system mount line ...For most of the time the word mmcblk0p5 or mmcblk06 or mmcblk07 is different so replace the last number of your Stock rom's updater script to Port Rom's Updater Script

- Now Compare the same with /data mount line ...
- After Comparing ... Save Port Rom's updater script and close it ... Now Open system folder in Both Port Rom and Stock Rom ...Open Build.prop of both roms with notepad ++ (right-click and edit with notepad ++) ... The screen will look like this...

- Now Replace the lines given below from Stock's Build.pop to Port's Build.prop...


- Now Save The Build.prop Of PORT ROM and Close it ...
- Now open system/etc in Both the Roms and delete firmware folder from Port Rom and Copy Firmware Folder from Stock Roms to Port Rom in etc...
- Now Open System/libs and replace these files from Stock Files to Port Files
- libaudio.primary.default.so
- libcamalgo.so
- libcamdrv.so
- libcameracustom.so
- libEGL.so
- libMali.so
- Now come back to Rom Directory of PORT ROM and select all files as shown and right-click and select Add To Archive then choose a name of your Choice ... NOTE :- ALWAYS SELECT ARCHIVE FORMAT TO ZIP


After Archiving ... U will get a zip in the same folder ... copy it to you sd card and flash and enjoy ... you can occur many bugs in rom .. so don't worry ... my next bug fixing guide will be soon

Post A Comment:
0 comments: